Create and Script Infrastructure
Methods for Provisioning Resources
Section titled “Methods for Provisioning Resources”Infrastructure as Code
Section titled “Infrastructure as Code”-
Infrastructure definitions: These definitions specify the components of your infrastructure, their configurations, and their integrations. They are often written as template files using JSON or YAML, which you then process with a provisioning tool, such as CloudFormation. These definitions can also be written using different SDKs, like the AWS CDK, which support common programming languages, such as Python or Typescript.
-
Shell scripts: When provisioning resources such as EC2 instances, your IaC processes can use shell scripts for automating infrastructure tasks. They can be used to install software, configure settings, and manage needed resources.
-
Application code: A core purpose of your infrastructure is hosting your application code. Your IaC solution typically interacts with the repository where you are storing your code and your workflows for code building and deployment.
Machine learning infrastructure types
Section titled “Machine learning infrastructure types”-
Model Building and Deployment
Your ML pipelines orchestrate various workflows, such as data preparation and model deployment. These workflows require the provisioning of compute resources to perform necessary tasks, such as container hosting and parallel processing. They require a mechanism for accessing a container image registry and deploying containers. Your pipelines need scalable and secure storage for handling large data sets and storing model outputs. You also need to deploy and configure resources, such as AWS Identity and Access Management (IAM) users, groups, and roles, for authenticating and authorizing access.
Completed workflows also require a mechanism to deprovision resources where possible to save costs. -
Inference
Models hosted on SageMaker require underlying compute resources for hosting the inference containers. This compute infrastructure can be Amazon Elastic Compute Cloud (Amazon EC2) instances or AWS Lambda, depending on the type of endpoint being deployed. The deployed models also require storage resources to support the ingestion of requests and generation of responses. Potential supporting resources include Amazon Simple Storage Service (Amazon S3), Amazon Elastic Block Store (Amazon EBS), and Amazon Elastic File Store (Amazon EFS).
-
Application
Application infrastructure can encompass everything from model endpoints to virtual private cloud (VPC) configurations, web servers, databases, caching layers, and other required services. Deployment of these resources also needs to support secure networking, monitoring, and logging capabilities.
Automating resource provisioning
Section titled “Automating resource provisioning”-
Reduces human error
With automated provisioning, your intended infrastructure configurations are applied every time. This also streamlines troubleshooting by limiting the opportunities for error.
-
Reduces release times
Automated resource provisioning can deploy new environments or scale resources faster than humans can. This helps your ML applications to quickly adapt to changing demands.
-
Maintains compliance
Automatically provisioned resources are always deployed with the same configurations. This ensures your defined security and compliance requirements are included with each deployment.
Approaches to IaC
Section titled “Approaches to IaC”-
Declarative
With declarative IaC, you can describe resources and settings that make up the end state of a desired system. The IaC solution then creates this system from the infrastructure code. This method is convenient to use as long as you know which components and settings you need to run your application.
-
Imperative
With imperative IaC, you describe all the steps to set up your resources and get to the desired system and running state. Although imperative IaC isn’t as convenient as declarative IaC, the imperative approach is necessary in complex infrastructure deployments. This is especially true when the order of events is critical.
For example, if you are provisioning a SageMaker model endpoint, you need to first create the Amazon Elastic Container Registry (Amazon ECR) repository for the following:- Container image
- Amazon S3 bucket and model artifacts
- Compute resources for hosting the inference containers
Key Benefits of IaC
Section titled “Key Benefits of IaC”-
Code management
Using infrastructure definitions as code applies traditional software development benefits to infrastructure management. This includes version control practices and collaboration and code reviews.
-
Repeatable provisioning
With IaC, you can reliably create, destroy, and recreate infrastructure resources for staging and development. You can even redeploy your entire infrastructure quickly in the event of a catastrophic outage.
-
Testing or experimentation
IaC helps you quickly provision and remove infrastructure resources as needed for model testing and benchmarking. You can also verify the functionality of infrastructure updates.
IaC Tools
Section titled “IaC Tools”-
AWS CloudFormation
You can use CloudFormation to model, provision, and manage AWS and third-party resources. You can define and provision AWS resources using templates written in JSON or YAML.
-
AWS CDK
The AWS CDK is an open-source software development framework that you use to define and provision AWS resources using familiar programming languages like TypeScript, Python, Java, and C#. It serves as an abstraction layer to efficiently produce CloudFormation templates.
-
Terraform
Terraform is a popular IaC tool that supports a wide range of cloud providers and services. You can use Terraform to manage infrastructure across multiple platforms using a consistent workflow and language.
-
Pulumi
Pulumi is an open source IaC tool that supports common programming languages, such as TypeScript, JavaScript, Python, Go, .NET, Java, and YAML. You can provision, update, and manage cloud infrastructure using a downloadable command line interface (CLI), runtime, libraries, and a hosted service.
Working with AWS CloudFormation
Section titled “Working with AWS CloudFormation”Getting started with CloudFormation is straightforward. First, you create a CloudFormation template that describes your infrastructure. CloudFormation uses this template to provision the resources. These resources are then managed as a CloudFormation stack.
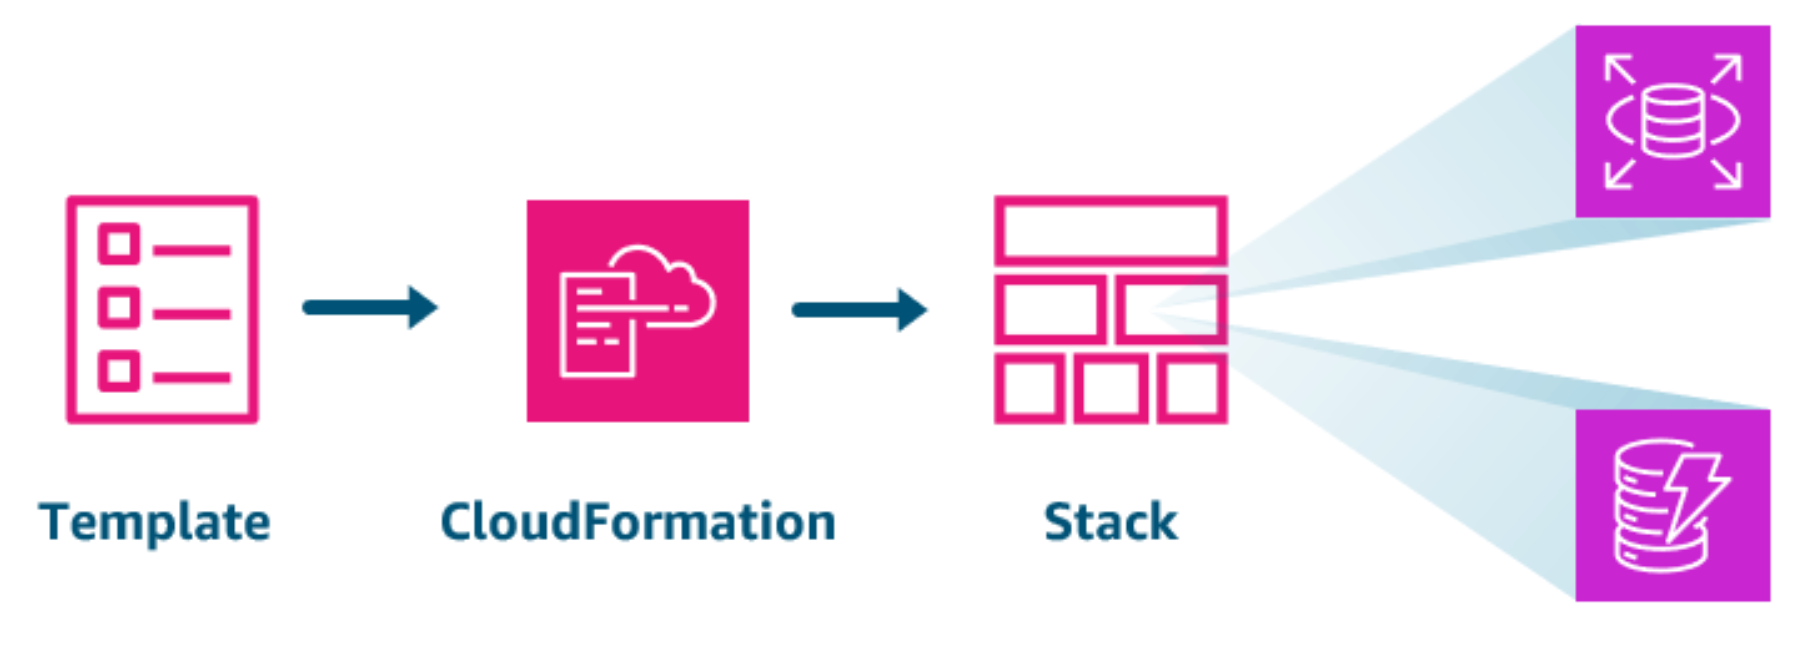
This CloudFormation template defines the database layer of an application that includes an Amazon DynamoDB database and an Amazon Relational Database Service (Amazon RDS) database. CloudFormation provisions these resources and manages them as a stack. All resources in a stack must be provisioned completely before CloudFormation reports the build as successful.
CloudFormation templates
Section titled “CloudFormation templates”A CloudFormation template is a text file written in either JSON or YAML that defines the resources that CloudFormation will provision as part of a stack. For instance, examine the following CloudFormation template written in JSON.
-
Format version
This first section identifies the AWS CloudFormation template version to which the template conforms.
"AWSTemplateFormatVersion" : "2010-09-09" -
Description
This text string describes the template.
"Description" : "Here are some details about the template." -
Metadata
These objects provide additional information about the template.
"Metadata" : {"Instances" : {"Description" : "Information about the instances"},"Databases" : {"Description" : "Information about the databases"}} -
Parameters
Parameters are values to pass to your template when you create or update a stack. You can refer to parameters from the Resources and Outputs sections of the template.
"Parameters" : {"InstanceTypeParameter" : {"Type" : "String","Default" : "t2.micro","AllowedValues" : ["t2.micro", "m1.small", "m1.large"],"Description" : "Enter t2.micro, m1.small, or m1.large. Default is t2.micro."}} -
Rules
Rules validate parameter values passed to a template during a stack creation or stack update.
"Rules" : {"Rule01": {"RuleCondition": {...},"Assertions": [...]}} -
Mappings
These are map keys and associated values that you can use to specify conditional parameter values. This is similar to a lookup table.
"Mappings" : {"Mapping01" : {"Key01" : {"Name" : "Value01"},...}} -
Conditions
Conditions control whether certain resources are created, or whether certain resource properties are assigned a value during stack creation or an update. For example, you could conditionally create a resource that depends on whether the stack is for a production or test environment.
"Conditions" : {"MyLogicalID" : {Intrinsic function}} -
Transform
For serverless applications, transform specifies the version of the AWS Serverless Application Model (AWS SAM) to use.
You can also use AWS::Include transforms to work with template snippets that are stored separately from the main AWS CloudFormation template. For more information, reference AWS::Include transform."Transform" : {set of transforms} -
Resources
This section specifies the stack resources, and their properties that you would like to provision. You can refer to resources in the Resources and Outputs sections of the template.
Note: This is the only required section of the template."Resources" : {"Logical ID of resource" : {"Type" : "Resource type","Properties" : {Set of properties}}} -
Outputs
Outputs describe the values that are returned whenever you view your stack’s properties. For example, you can declare an output for an Amazon S3 bucket name and then call the
aws cloudformation describe-stacksAWS CLI command to view the name."Outputs" : {"Logical ID of resource" : {"Description" : "Information about the value","Value" : "Value to return","Export" : {"Name" : "Name of resource to export"}}}
SageMaker Endpoint Example
Section titled “SageMaker Endpoint Example”The following example creates an endpoint configuration from a trained model, and then creates an endpoint.
{ "Description": "Basic Hosting entities test. We need models to create endpoint configs.", "Mappings": { "RegionMap": { "us-west-2": { "NullTransformer": "12345678901.dkr.ecr.us-west-2.amazonaws.com/mymodel:latest" }, "us-east-2": { "NullTransformer": "12345678901.dkr.ecr.us-east-2.amazonaws.com/mymodel:latest" }, "us-east-1": { "NullTransformer": "12345678901.dkr.ecr.us-east-1.amazonaws.com/mymodel:latest" }, "eu-west-1": { "NullTransformer": "12345678901.dkr.ecr.eu-west-1.amazonaws.com/mymodel:latest" }, "ap-northeast-1": { "NullTransformer": "12345678901.dkr.ecr.ap-northeast-1.amazonaws.com/mymodel:latest" }, "ap-northeast-2": { "NullTransformer": "12345678901.dkr.ecr.ap-northeast-2.amazonaws.com/mymodel:latest" }, "ap-southeast-2": { "NullTransformer": "12345678901.dkr.ecr.ap-southeast-2.amazonaws.com/mymodel:latest" }, "eu-central-1": { "NullTransformer": "12345678901.dkr.ecr.eu-central-1.amazonaws.com/mymodel:latest" } } }, "Resources": { "Endpoint": { "Type": "AWS::SageMaker::Endpoint", "Properties": { "EndpointConfigName": { "Fn::GetAtt": ["EndpointConfig", "EndpointConfigName"] } } }, "EndpointConfig": { "Type": "AWS::SageMaker::EndpointConfig", "Properties": { "ProductionVariants": [ { "InitialInstanceCount": 1, "InitialVariantWeight": 1, "InstanceType": "ml.t2.large", "ModelName": { "Fn::GetAtt": ["Model", "ModelName"] }, "VariantName": { "Fn::GetAtt": ["Model", "ModelName"] } } ] } }, "Model": { "Type": "AWS::SageMaker::Model", "Properties": { "PrimaryContainer": { "Image": { "Fn::FindInMap": ["AWS::Region", "NullTransformer"] } }, "ExecutionRoleArn": { "Fn::GetAtt": ["ExecutionRole", "Arn"] } } }, "ExecutionRole": { "Type": "AWS::IAM::Role", "Properties": { "AssumeRolePolicyDocument": { "Version": "2012-10-17", "Statement": [ { "Effect": "Allow", "Principal": { "Service": ["sagemaker.amazonaws.com"] }, "Action": ["sts:AssumeRole"] } ] }, "Path": "/", "Policies": [ { "PolicyName": "root", "PolicyDocument": { "Version": "2012-10-17", "Statement": [ { "Effect": "Allow", "Action": "*", "Resource": "*" } ] } } ] } } }, "Outputs": { "EndpointId": { "Value": { "Ref": "Endpoint" } }, "EndpointName": { "Value": { "Fn::GetAtt": ["Endpoint", "EndpointName"] } } }}To learn more about CloudFormation templates, reference Working with CloudFormation Templates.
Layered Architecture
Section titled “Layered Architecture”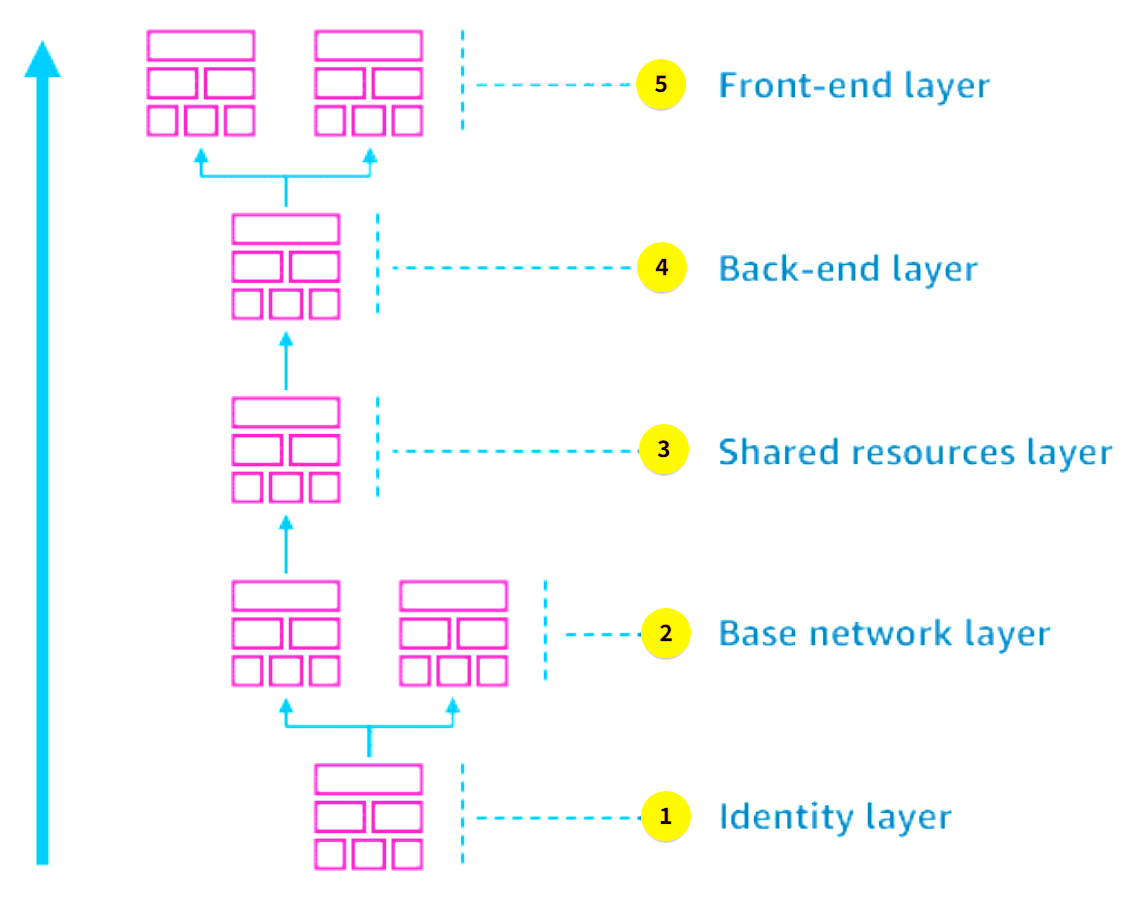
-
Identity layer
Your identity layer can define your IAM users, groups, and roles.
-
Base network layer
Your base network layer can include VPCs, internet gateways, virtual private networks (VPNs), and NAT gateways.
-
Shared resources layer
Your shared resources layer can include databases, common monitoring or alarms, subnets, and security groups. It can also include storage for your model artifacts, and training, validation and test data sets.
-
Back-end layer
Your back-end layer can include model endpoints, Lambda functions, and application servers.
-
Front-end layer
Your front-end layer can include the web interface, admin interface, or analytics dashboard.
Working with the AWS CDK
Section titled “Working with the AWS CDK”CDK Constructs
Section titled “CDK Constructs”-
Lower-level constructs, such as L1 constructs, can represent a single resource from a single AWS service.
-
Higher-level constructs, such as L2 constructs and L3 constructs, can represent a more complex component consisting of multiple preconfigured AWS resources.
-
L1 constructs
Low-level, or L1, constructs directly represent all resources available in CloudFormation. They are sometimes called CFN resources. You use L1 constructs when you need to explicitly configure all resource properties to the same level of granularity as a CloudFormation template.
-
L2 constructs
L2 constructs are the next level of constructs. Like L1, they represent AWS individual resources, but they also provide a level of abstraction. L2 constructs incorporate the defaults, boilerplate, and glue logic you would be writing yourself with a CFN Resource construct. They reduce the need to know all the details about the AWS resources they represent. L2 constructs also provide convenient methods to help you to work with the resource.
-
L3 constructs (Patterns)
The AWS Construct Library includes even higher-level, L3 constructs, called patterns. AWS CDK patterns declare multiple resources to create entire AWS architectures for specific use cases.
To explore the constructs available for different AWS services, consult the AWS Construct Library.
AWS Solutions Constructs is an open-source extension of the AWS CDK and provides additional experimental patterns. To view the available patterns, explore the Github Repository.
Deploying resources with the AWS CDK Toolkit
Section titled “Deploying resources with the AWS CDK Toolkit”Developers interact with their CDK app using the AWS CDK Toolkit, also referred to as the AWS CDK Command Line Interface (AWS CDK CLI). By using this command line tool, developers can do the following:
- Synthesize artifacts, such as AWS CloudFormation templates.
- Deploy stacks to development AWS accounts.
- Compare against a deployed stack to understand the impact of a code change.
- Destroy stacks to delete the resources when no longer needed. This saves on unnecessary costs.
cdk init
When you begin your CDK project, you create a directory for it, run cdk init, and specify the programming language used:
mkdir my-cdk-appcd my-cdk-appcdk init app --language typescriptcdk bootstrap
You then run cdk bootstrap to prepare the environments into which the stacks will be deployed. This creates the special dedicated AWS CDK resources for the environments.
cdk synth
Next, you synthesize the CloudFormation templates using the cdk synth command. When updating existing stacks, you can run cdk diff to compare the resources defined in your app with the already-deployed version of the stack.
cdk deploy
Finally, you can run the cdk deploy command to have CloudFormation provision resources defined in the synthesized templates.
Comparing AWS CloudFormation and AWS CDK
Section titled “Comparing AWS CloudFormation and AWS CDK”| AWS CloudFormation | AWS CDK | |
|---|---|---|
| Authoring experience | CloudFormation only uses JSON or YAML templates to define your infrastructure resources. These are more convenient to write than many programming languages. However, these templates can become verbose and complex as your infrastructure grows, making them more challenging to maintain and modify. | With AWS CDK, you can define your infrastructure using modern programming languages, like Python, TypeScript, Java, C#, and Go. This approach provides a familiar and expressive coding experience. You can also use standard software development practices to write modular and reusable infrastructure components. |
| IaC approach | CloudFormation templates are declarative. You define the desired state of your infrastructure and CloudFormation handles the provisioning and updates. | AWS CDK provides an imperative approach to generating CloudFormation templates, which are declarative. Working with programming languages, instead of templates means you can introduce logic and conditions that determine the resources to provision in your infrastructure. |
| Debugging and troubleshooting | Troubleshooting CloudFormation templates requires learning specific CloudFormation error handling and messages. | With the CDK, you can use the debugging capabilities of your chosen programming language, making it more convenient to identify and fix issues in your infrastructure code. |
| Reusability and modularity | With CloudFormation, you can create nested stacks and cross-stack references, resulting in modular and reusable infrastructure designs. However, this approach can become complex and difficult to manage as your infrastructure grows. | AWS CDK supports programming languages that you can use to apply object-oriented programming principles. This makes it more convenient to create modular and reusable IaC code blocks for your infrastructure, which are managed as part of an application. |
| Community support | CloudFormation has been around for a longer time and has a larger community for support. It also has a variety of third-party tools and resources. | AWS CDK is a newer offering than AWS CloudFormation, but it is rapidly gaining adoption. It has an active community that shares best practices and contributes to its development. This includes collections of code samples and access to libraries in development. |
| Learning curve | AWS CloudFormation has a steeper learning curve for developers who are used to a more programmatic approach over a template-driven approach. However, AWS CloudFormation has become a standard method for IaC in the AWS Cloud, and your organization might have existing expertise. | If you’re already familiar with programming languages like Python or TypeScript, AWS CDK will have a gentler learning curve. Your existing knowledge of application design and interacting with software libraries and APIs will help you learn AWS CDK. |
Deploying and Hosting Models
Section titled “Deploying and Hosting Models”Amazon SageMaker Python SDK
Section titled “Amazon SageMaker Python SDK”The SageMaker Python SDK provides classes and methods for configuring and running tasks in your model building and deployment workflows. Consider the following SageMaker Pipeline example. In this example, the SageMaker Python SDK orchestrates many of the tasks in the machine learning lifecycle, including data processing and model development tasks.
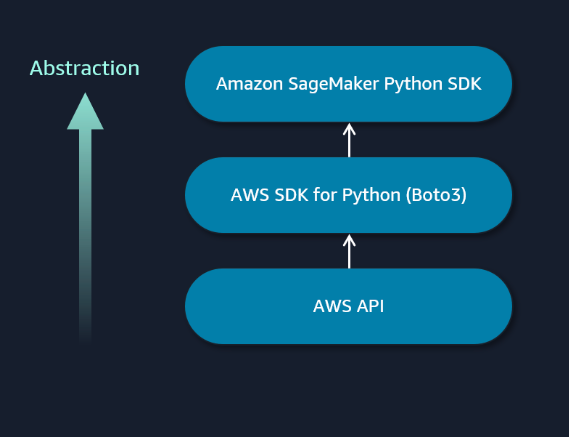
Creating pipelines with the SageMaker Python SDK to orchestrate workflows
pipeline = Pipeline( name=pipeline_name, parameters=[input_data, processing_instance_type, processing_instance_count, training_instance_type, mse_threshold, model_approval_status], steps = [step_process, step_train, step_evaluate, step_conditional])Defining steps
step_process = ProcessingStep(...),step_train = TrainingStep(…),To learn more about using the SageMaker SDK to create different step types supported by Amazon SageMaker Pipelines, explore the Steps class documentation.
Automating your pipeline
Defining your pipelines as code is essential when taking an IaC approach to deploying your model building and deployment infrastructure.
-
Access stored pipeline code
Your SageMaker Python SDK pipeline code is accessed from a code repository.
-
Provision model building pipeline infrastructure
Your continuous integration and continuous deployment (CI/CD) tools receive an automated notification to start the pipeline. The tools pull this code, while passing in input parameters for this particular job. The code is then run to build the pipeline and necessary infrastructure.
-
Train model
The pipeline uses the parameters to complete steps of the pipeline. This includes the location of the training data, the training instance type, and the model approval threshold.
-
Register model
If the trained model meets the approval threshold, it is registered in your model registry. It can then be accessed by your deployment pipeline.
-
Deprovision pipeline resources
After the pipeline completes, your CI/CD tools de-provision the resources that are no longer in use. This helps you to avoid paying for idle resources.
Building and Maintaining Containers
Section titled “Building and Maintaining Containers”SageMaker containers
Training and inference containers in SageMaker must adhere to certain requirements. For instance, you must follow a specific folder structure. Containers provided by SageMaker already have this folder structure in place. Any container that you extend or build new must also follow this structure.
Training containers
Section titled “Training containers”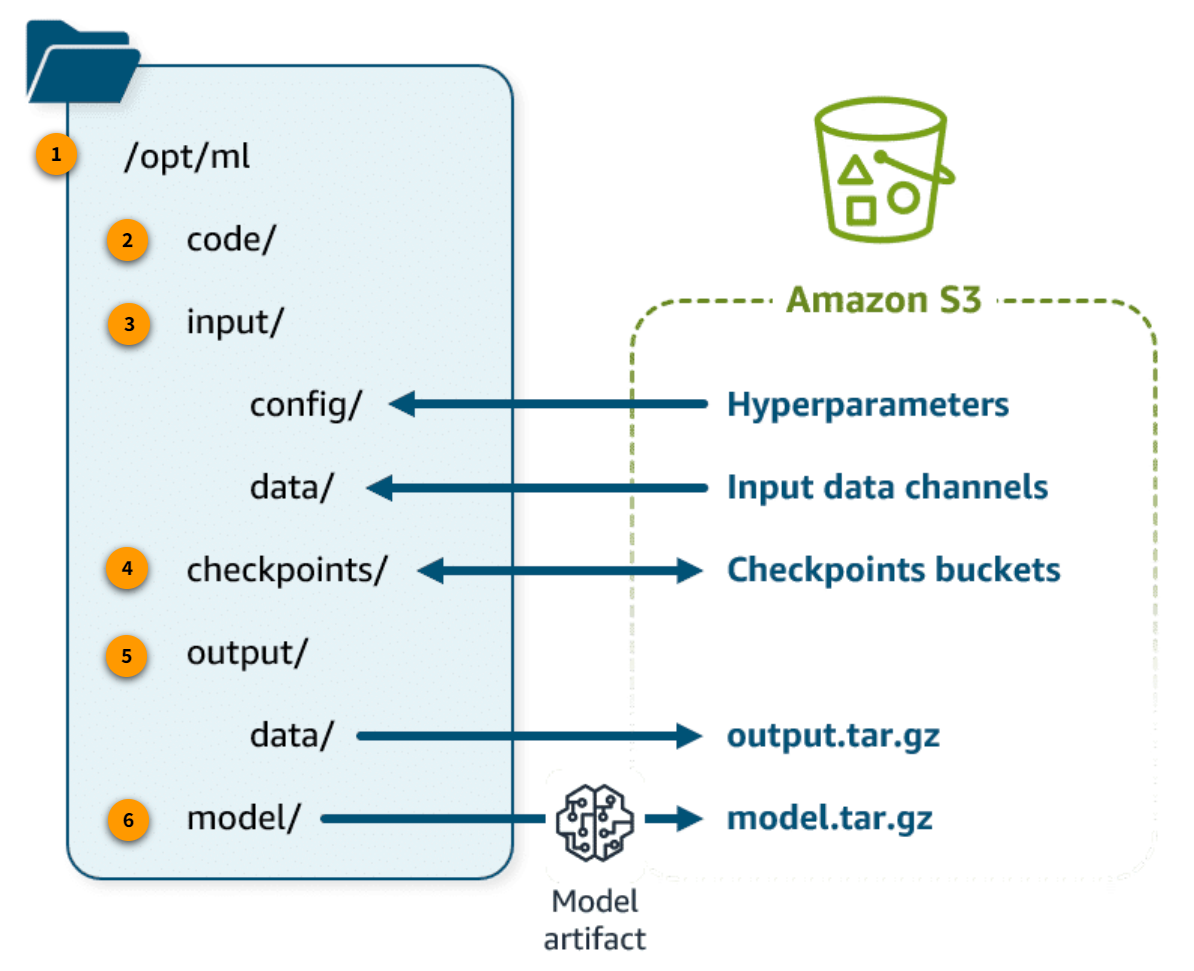
-
/opt/ml
This is the top level of the directory.
-
/opt/ml/code/
This directory holds the scripts that the container will run, such as custom training algorithms in script mode in /opt/ml/code/.
-
/opt/ml/input/
This directory holds the folders that receive inputs for the training job: /opt/ml/input/config/ holds the JSON files that configure the hyperparameters for the training algorithm and the resources used for distributed training. /opt/ml/input/data/ holds each channel of training data accessed from Amazon S3.
-
/opt/ml/checkpoints/
If you use checkpointing, Amazon SageMaker saves checkpoints locally in this directory and then synchs them to the specified location in Amazon S3.
-
/opt/ml/output/
This directory holds the folders that store files output by the training job: /opt/ml/output/data/ holds the output data, which the training job sends to Amazon S3 as output.tar.gz.
-
/opt/ml/model/
The model artifact created by the training job is stored here. When training is finished, the final model artifact in this folder is written to Amazon S3 as model.tar.gz.
SageMaker training uses environment variables to define storage paths for training datasets, model artifacts, checkpoints, and outputs between AWS Cloud storage and training jobs. For more information, refer to SageMaker Environment Variables and Default Paths for Training Storage Locations.
Inference containers
Section titled “Inference containers”-
Your container must include the path /opt/ml/model. When the inference container starts, it will import the model artifact and store it in this directory. Note: This is the same directory that a training container uses to store the newly trained model artifact.
-
Your container must be configured to run as an executable. Your Dockerfile should include an ENTRYPOINT instruction that defines an executable to run when the container starts, as in the following example:
ENTRYPOINT ["python", "serve.py"] -
Your container must have a web server listening on port 8080.
-
Your container must accept POST requests to the /invocations and /ping real-time endpoints. The requests that you send to these endpoints must be returned with 60 seconds and have a maximum size of 6 MB.

-
serve.py
serve.py runs when the container is started for hosting. It starts the inference server, including the nginx web server and Gunicorn as a Python web server gateway interface.
-
predictor.py
This Python script contains the logic to load and perform inference with your model. It uses Flask to provide the /ping and /invocations endpoints.
-
wsgi.py
This is a wrapper for the Gunicorn server.
-
nginx.conf
This is a script to configure a web server, including listening on port 8080. It forwards requests containing either /ping or /invocations paths to the Gunicorn server.
Managing containers on AWS
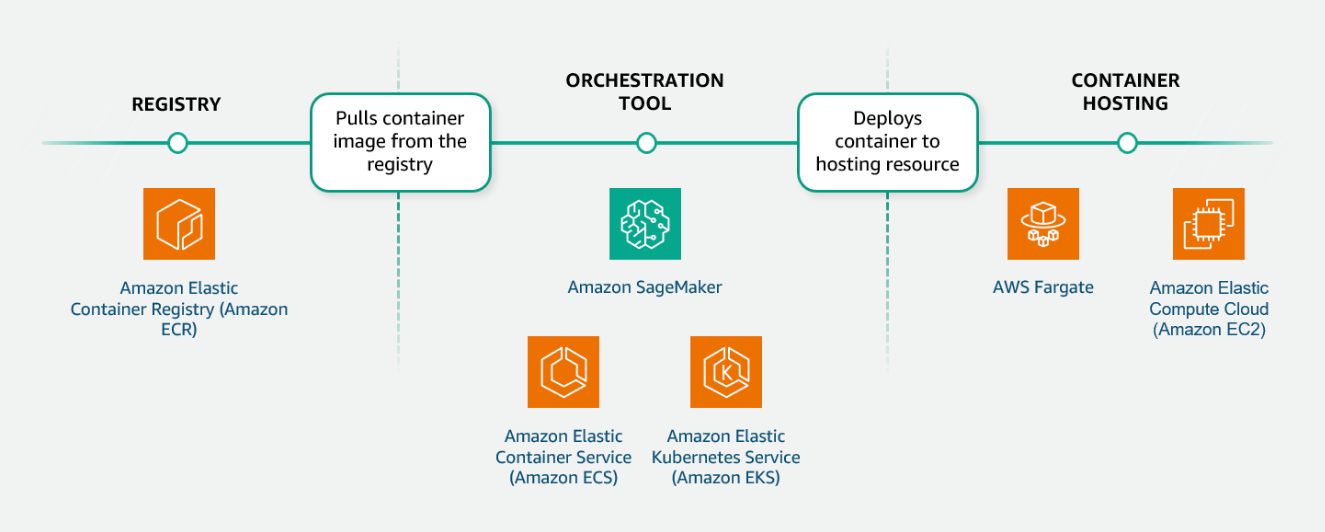
Section titled “Managing containers on AWS”When running machine learning applications that use containers, you need to select your container management tools. Container management tools can be broken down into three categories: registry, orchestration, and hosting.
- Registry
When you develop containerized applications, you build a container image that holds everything needed to run your container. This container image includes application code, runtime, system tools, system libraries, and settings. You push your images to a repository for version control and pull those images from the repository to deploy containers.
AWS offers Amazon Elastic Container Registry (Amazon ECR) as a container image registry that supports integration with other AWS services.
-
Orchestration Tool
-
Amazon SageMaker includes container orchestration capabilities. During model training, you identify the training container image to use and the EC2 instance type. SageMaker then handles the creation of the container and its connections to the required training resources. When you deploy a SageMaker endpoint, you can identify the model to use in the SageMaker Model Registry. This includes a reference to the inference container image. The model endpoint scales inference capacity based on your scaling policy.
-
Amazon ECS is a container orchestration service that offers a more managed model for deploying your containers. Amazon ECS features additional integrations with other AWS services.
-
Amazon Elastic Kubernetes Service (Amazon EKS) is a managed service that you can use to run the Kubernetes container orchestration software on AWS. You might choose this option if your application infrastructure is already using Kubernetes. Or, you might choose this option when you require additional control over your containerized workflow configurations.
-
Auto Scaling Inference Infrastructure
Section titled “Auto Scaling Inference Infrastructure”SageMaker model auto scaling methods
Section titled “SageMaker model auto scaling methods”-
Target tracking scaling policy
With a target-tracking scaling policy, you specify a predefined or custom metric and a target value for the metric. The tracking policy calculates the scaling adjustment based on the metric and the target value. The scaling policy adds or removes capacity as required to keep the metric at, or close to, the specified target value.
-
Step scaling policy
With step scaling, you choose scaling metrics and threshold values for the CloudWatch alarms that invoke the scaling process. You also define how your scalable target should be scaled when a threshold is in breach for a specified number of evaluation periods.
With a target tracking policy, capacity is automatically scaled to maintain the target metric value. With step scaling, you define multiple policies that specify the number of instances to scale at specific metric thresholds. It helps you to configure a more aggressive response when demand reaches certain levels. For more information about configuring a step scaling policy, consult How Step Scaling for Application Auto Scaling Works in the Application Auto Scaling User Guide. -
Scheduled scaling policy
You can use scheduled scaling when you know that the demand follows a particular schedule in the day, week, month, or year. Scheduled scaling helps you specify a one-time schedule or a recurring schedule. Or you can specify cron expressions along with start and end times, which form the boundaries of when the autoscaling action starts and stops.
When you scale based on a schedule, you can scale your application in response to predictable load changes. -
On-demand scaling
Use on-demand scaling only when you want to increase or decrease the number of instances manually. For example, you might want to use on-demand scaling under the following circumstances:
- New product launch: When a company releases a new product, traffic patterns might be unknown and hard to predict.
- Traffic spikes: Consider ticket sales for an event. The event announcement can drive unexpected traffic to the application.
- Special promotions or ad campaigns: These events can cause higher traffic and might be a good use case for on-demand scaling.
Resources
Section titled “Resources”Machine Learning Lens To learn more about the ML lens of the AWS Well-Architected Framework, choose the following button.
Infrastructure as Code (IaC) To learn more about choosing an IaC tool for your organization, choose the following button.
AWS CloudFormation Stacks For more information about cross-stack references, choose the following button.
AWS CloudFormation For more information about the available resource types in AWS CloudFormation, choose the following button.
SageMaker Resource Type Reference To explore the available SageMaker resource types in AWS CloudFormation, choose the following button.
AWS Construct Library For documentation on the constructs available for different AWS services, choose the following button.
AWS Solutions Constructs AWS solutions constructs is an open-source extension of the AWS CDK and provides additional patterns. To view the available patterns, choose the following button.
Steps Class For additional information on using the Amazon SageMaker SDK for creating the different step types supported by Amazon SageMaker Pipelines, choose the following button.
SageMaker Automatic Model Tuning You can also use the HyperparameterTuner class for creating and interacting with hyperparameter training jobs. For more information, choose the following button.
Amazon SageMaker Model Building Pipeline For more information about the Amazon SageMaker Python SDK model building pipeline, choose the following button.
SageMaker Environment Variables and Default Paths for Training Storage Locations To explore the mappings between SageMaker environment variables and the SageMaker container folder structure, choose the following button.
AWS Fargate For a list of supported configurations of AWS Fargate CPU capacity settings and their corresponding memory capacity settings, choose the following button.
How Step Scaling for Application Auto Scaling Works For more information about configuring a step scaling policy, choose the following button.